The Google Pixel 3a XL is a 2019 smartphone from Google that offers a great camera and a long battery life. It has a 6-inch OLED screen with a 1080 x 2160 pixel resolution, a 12.2MP camera on the back and an 8MP camera on the front, a Snapdragon 670 chipset, 4GB of RAM and 64GB of storage. It comes with Android 9.0 (Pie) out of the box, which can be updated to Android 12. It also has features like 3.5mm headphone jack, stereo speakers, fingerprint scanner and Google Assistant.

The Google Pixel 3a XL stands out for its amazing camera quality, which is enhanced by software features like Night Sight, which improves low-light photos, Super Res Zoom, which improves digital zoom, and Top Shot, which picks the best photo from a burst. It also has some smart AI features like Call Screen, which lets you use Google Assistant to filter incoming calls and see the transcript in real time, and Now Playing, which identifies songs playing around you and shows them on the lock screen. The phone also has a long battery life with a 3700 mAh battery that supports 18W fast charging.
Some disadvantages of the Google Pixel 3a XL are the absence of a memory card slot or wireless charging, which limits your choices for storage expansion and convenience. The phone also has a relatively low-end processor compared to some of its competitors. The phone also has some problems with performance and software bugs reported by some users.
The Google Pixel 3a XL is available in three colors: Just Black, Clearly White and Purple-ish. The price varies depending on the region.
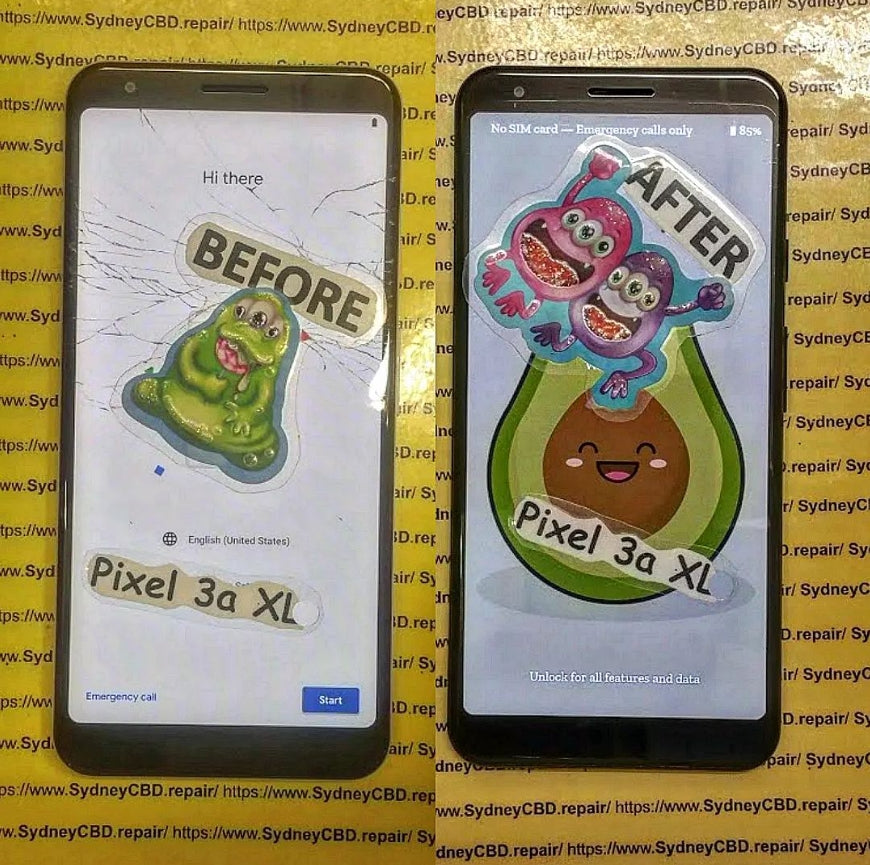
💞The good news is that the Pixel 3a XL screen can be replaced
Either by yourself or by a professional service. The bad news is that the replacement process is not very easy and may affect the warranty of your phone. Therefore, you should carefully weigh the pros and cons of each option before deciding. If you want to replace the screen by yourself, you will need some tools and parts, such as a heat gun, a suction cup, an opening pick, a spudger, a screwdriver, and a replacement screen assembly. You can find these items online or at some local stores. You will also need to follow a detailed guide that shows you how to safely open your phone, disconnect the battery and other components, remove the old screen, and install the new one.
However, replacing the screen by yourself has some risks and challenges. First of all, you will need to heat up the edges of the screen with a heat gun or an iOpener to loosen the adhesive holding it in place. Second, you will need to be careful not to damage the OLED panel under the glass while prying and slicing the screen. Third, you will need to transfer the original earpiece speaker and front camera to your new screen. Fourth, you will need to apply new adhesive to seal your phone properly. Fifth, you will void your phone's warranty if you open it yourself.
🛠️If you don't feel confident or comfortable replacing the screen by yourself, you can opt for a professional service instead
The advantage of using a professional service is that you can avoid the hassle and risk of doing it yourself and ensure that your phone is repaired by qualified technicians using genuine parts. The disadvantage is that you may have to pay more for the service and wait longer for your phone to be fixed. You may also lose some of your personal data if you don't back up your phone before sending it for repair. But it's up to you what repair you really want.
DIY or Do it yourself ( do it with your own risks )
Tools and Materials Needed:
1. Replacement Pixel 3a XL screen (make sure it is compatible)
2. Heat gun or hairdryer
3. Pry tool or plastic opening tool
4. Small Phillips screwdriver
5. Tweezers
6. Adhesive tape or double-sided adhesive
7. Clean cloth or microfiber cloth
8. Isopropyl alcohol or screen cleaner
9. Safety glasses or protective goggles
10. Anti-static wrist strap (optional but recommended)
11. Container or magnetic mat to keep screws organized
Preparations:
1. Before proceeding, make sure to turn off the Pixel 3a XL and remove any cables or accessories.
2. For safety, wear protective glasses or goggles throughout the process.
3. Consider using an anti-static wrist strap to prevent damage from static electricity.
4. Prepare a clean and well-lit workspace with a soft surface, such as a table covered with a soft cloth or towel.
Step 1: Removing the Back Panel
1. Begin by heating the back panel of the Pixel 3a XL using a heat gun or hairdryer for about 1-2 minutes. This will soften the adhesive holding the panel.
2. Insert a pry tool or plastic opening tool into the gap between the back panel and the frame of the phone.
3. Work the tool around the edges to gradually separate the back panel from the adhesive underneath.
4. Be cautious while prying and ensure not to apply excessive force to avoid damaging the phone or breaking the back panel.
Step 2: Disconnecting the Battery
1. Locate the battery connector near the center of the phone.
2. Use a small Phillips screwdriver to remove the screws holding the battery connector in place.
3. Gently disconnect the battery cable by lifting it up using the pry tool or plastic opening tool.
4. Leave the battery disconnected throughout the rest of the replacement process to avoid any risk of short-circuits.
Step 3: Removing the Motherboard Cover
1. Identify the screws securing the motherboard cover.
2. Remove the necessary screws using a small Phillips screwdriver.
3. Carefully remove the motherboard cover by lifting it off with your fingers or using the pry tool.
4. Set the motherboard cover and screws aside in a safe place.
Step 4: Disconnecting and Removing the Screen
1. Locate the screen connector, which is attached to the motherboard.
2. Gently lift the connector using the pry tool or plastic opening tool to disconnect it from the motherboard. Be careful not to damage the connector.
3. Once the connector is disconnected, gently lift the screen up and away from the phone's body.
4. Place the old screen aside and proceed to clean the phone frame with a clean cloth or microfiber cloth.
5. Remove any adhesive residue using isopropyl alcohol or screen cleaner.
Step 5: Installing the New Screen
1. Take the replacement Pixel 3a XL screen and ensure it is in good condition without any visible damage before installing.
2. Align the new screen with the phone's frame, ensuring that the connector aligns with the motherboard connection.
3. Carefully press the screen into place, applying even pressure to ensure proper adhesion.
4. Reconnect the screen connector to the motherboard by carefully pressing it into place. Ensure it is firmly connected.
5. Reattach the motherboard cover and secure it with the screws removed earlier.
Step 6: Reconnecting the Battery and Closing the Phone
1. Reconnect the battery cable to the motherboard by pressing it back into place.
2. Secure the battery connector with the screws that were removed earlier.
3. Double-check all connections and ensure everything is snug and secure.
4. With the new screen successfully installed, carefully place the back panel back onto the phone.
5. Apply gentle pressure to the back panel to ensure it properly adheres to the frame.
6. The replacement process is now complete.
📌Troubleshooting Advice
1. If the screen does not turn on after replacement, ensure that all connections are securely in place and the battery is properly connected.
2. If the touch screen is unresponsive, recheck the screen connector and make sure it is properly seated.
3. Check for any visible damage to the connectors, cables, or screen itself that may affect functionality.
4. If the phone does not power on or seems to have other issues, consider rechecking all connections and following the steps again with extra caution.
🏷️Tips and Precautions
1. Take your time throughout the replacement process to avoid rushing and making mistakes.
2. Use caution when prying and ensure not to apply too much force to avoid damage.
3. Keep screws and small parts organized in a container or on a magnetic mat to prevent loss or confusion.
4. If necessary, take pictures or make notes to help remember the locations of the connectors, screws, or any other important details.
5. Be careful when working with the heat gun or hairdryer, as excessive heat can damage the phone. Always maintain a safe distance and move the heat source continuously.
Note: This guide provides general instructions, and the screen replacement process may vary slightly depending on the specific model or version of the Pixel 3a XL smartphone. Always consult the manufacturer's guidelines and any additional resources available for your specific device before attempting a screen replacement.
The Pixel 3a XL screen can be replaced, but it is not an easy or cheap process. You should consider the pros and cons of each option before making a decision. If you decide to replace it by yourself, make sure you have the right tools and parts and follow a reliable guide. If you decide to use a professional service, make sure you check your warranty status and repair options and back up your phone before sending it for repair.
google pixel 3a xl screen
pixel 3a xl screen replacement cost
pixel 3a xl screen replacement near me
google pixel 3a xl screen size
pixel 3a xl screen protector
pixel 3a screen replacement
pixel 3a xl battery replacement
pixel 3a xl screen replacement kit